2024-10-01
快速體驗Altera Cyclone V SOC實驗平台

前言
Altera 是一家FPGA製造商。SoC FPGA被稱為HPS(Hard Processor System)。這些元件結合了FPGA的靈活性和處理器的計算能力,適用於各種應用,例如嵌入式系統、物聯網、視覺處理等。以下章節能讓您快速體驗Altera Cyclone V SOC設計平台。
必備工具
Cyclone V Soc Development kit
Quartus Standard 22.1
Golden Hardware Reference Design(Rocket Board)
Linux Ubuntu 20.04
分為三部分
- 硬體設計
- 環境建立
- 軟體執行
1.透過GSRD修改FPGA硬體
1.1 下載GSRD
Rocket Board:
https://www.rocketboards.org/foswiki/Documentation/CycloneVSoCGSRD
Altera:
Cyclone V SOC kit installation
https://www.intel.com/content/www/us/en/products/details/fpga/development-kits/cyclone/v-sx.html
1.2 透過Quartus std 22.1開啟
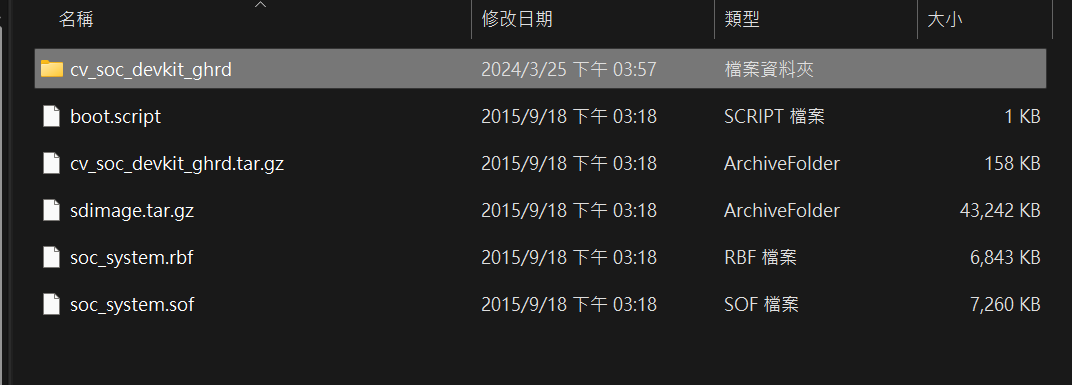
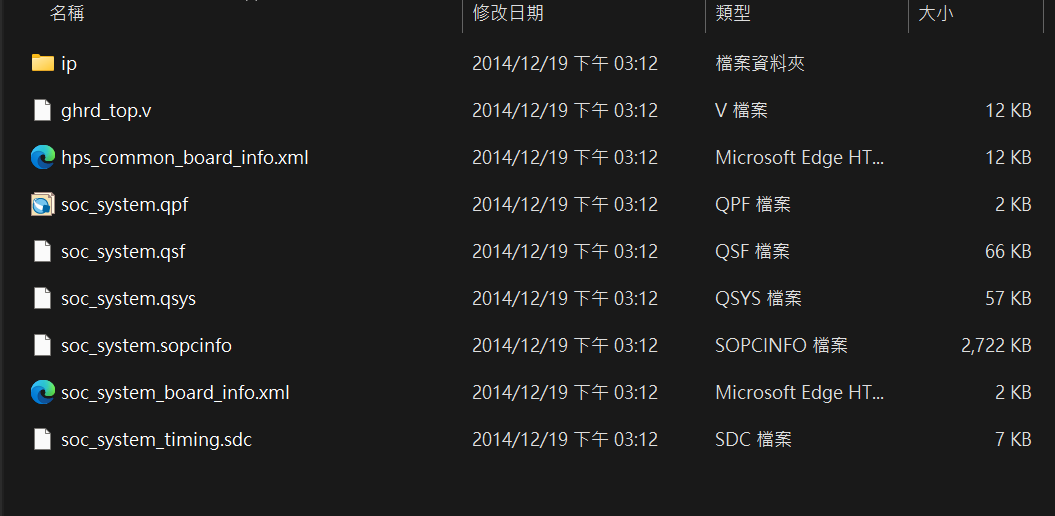
開啟GSRD Project
/cycloneV/kits/golden_system_ref_design/hardware
包含Quartus project 以及SOC Image file
1.3 soc_system.qsys 說明
基本透過Bridge去連結HPS以及PIO。如只保留單一點燈,可將System ID以及大多數Bridge、PIO刪除。
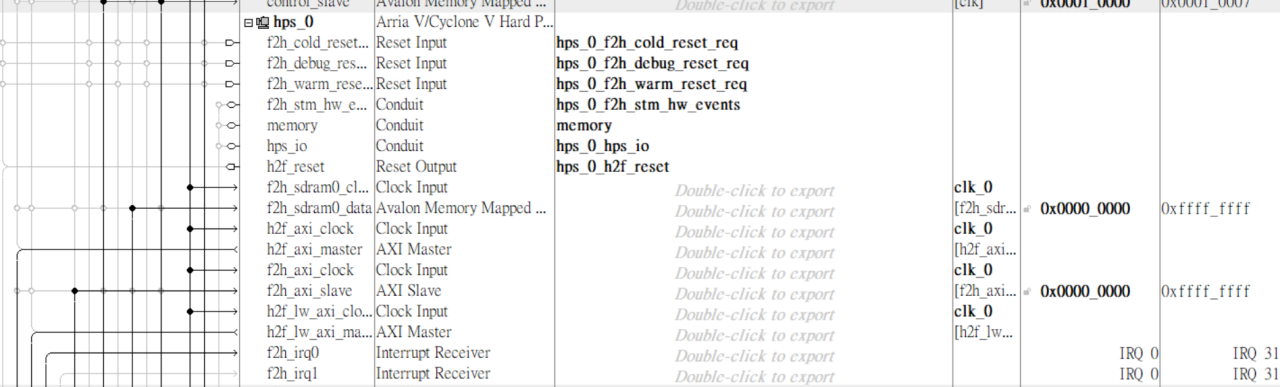 ARM Cortex™-A9 MPCore HPS
其中f2h_axi代表FPGA端到HPS端的通訊bus,h2f_axi代表HPS到FPGA端的通訊bus,h2f_lw_axi表示低速的通訊。
詳細可參閱:https://www.intel.com/content/dam/www/programmable/us/en/pdfs/literature/hb/cyclone-v/cv_54001.pdf
 Four user push-button inputs
 Ten user DIP switch inputs
 Ten user I/O for LED outputs
 64KB of on-chip memory
 JTAG to Avalon master bridges
 Interrupt capturer for use with System Console
 System ID
 Bridge
 各Bridge分別連到HPS、PIO
可在此根據點燈需求,修改PIO,包含控制數量等等。
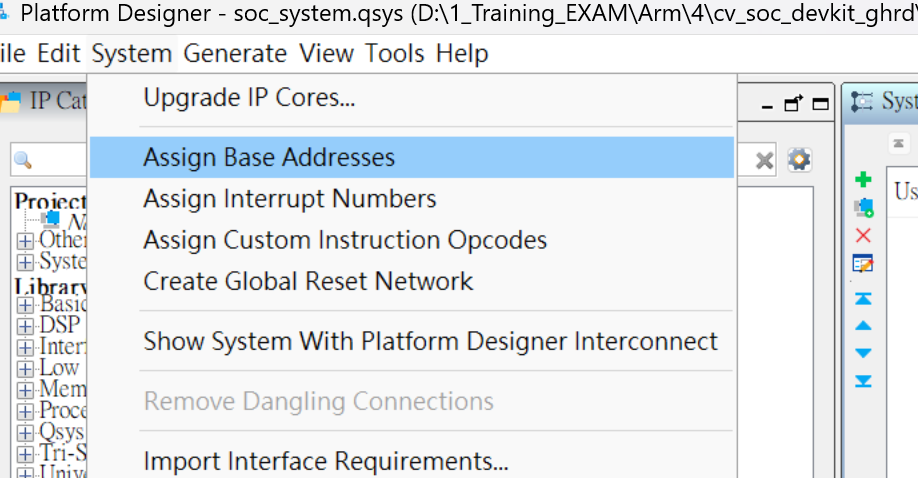
修改完畢可透過Assign Base Addresses 重新分配地址。
1.3 soc_system.qsys 說明
基本透過Bridge去連結HPS以及PIO。如只保留單一點燈,可將System ID以及大多數Bridge、PIO刪除。
1.4 RTL Code
基本不動,將IP引用到相關PIN腳。
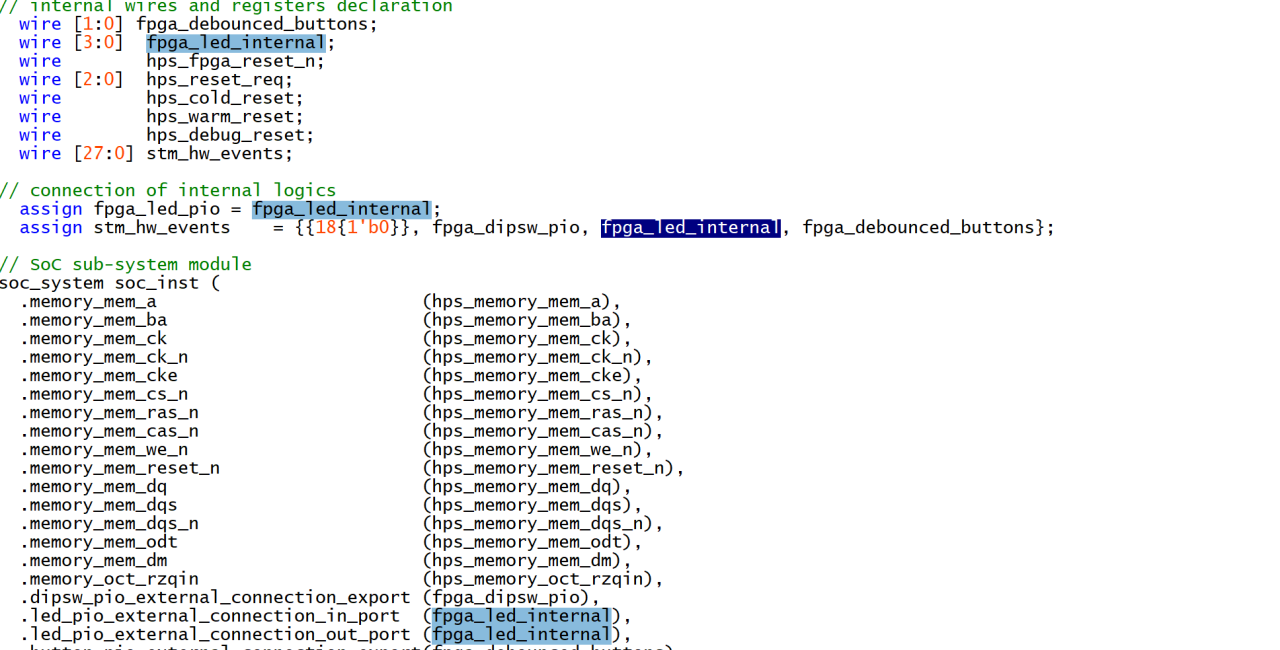
若有對PIO進行修改,便須更改上層對應PIN。
Example:若LED相關PIO修改控制數量,需針對以下訊號更改。目前為4bit。
1.5 Compiler Project
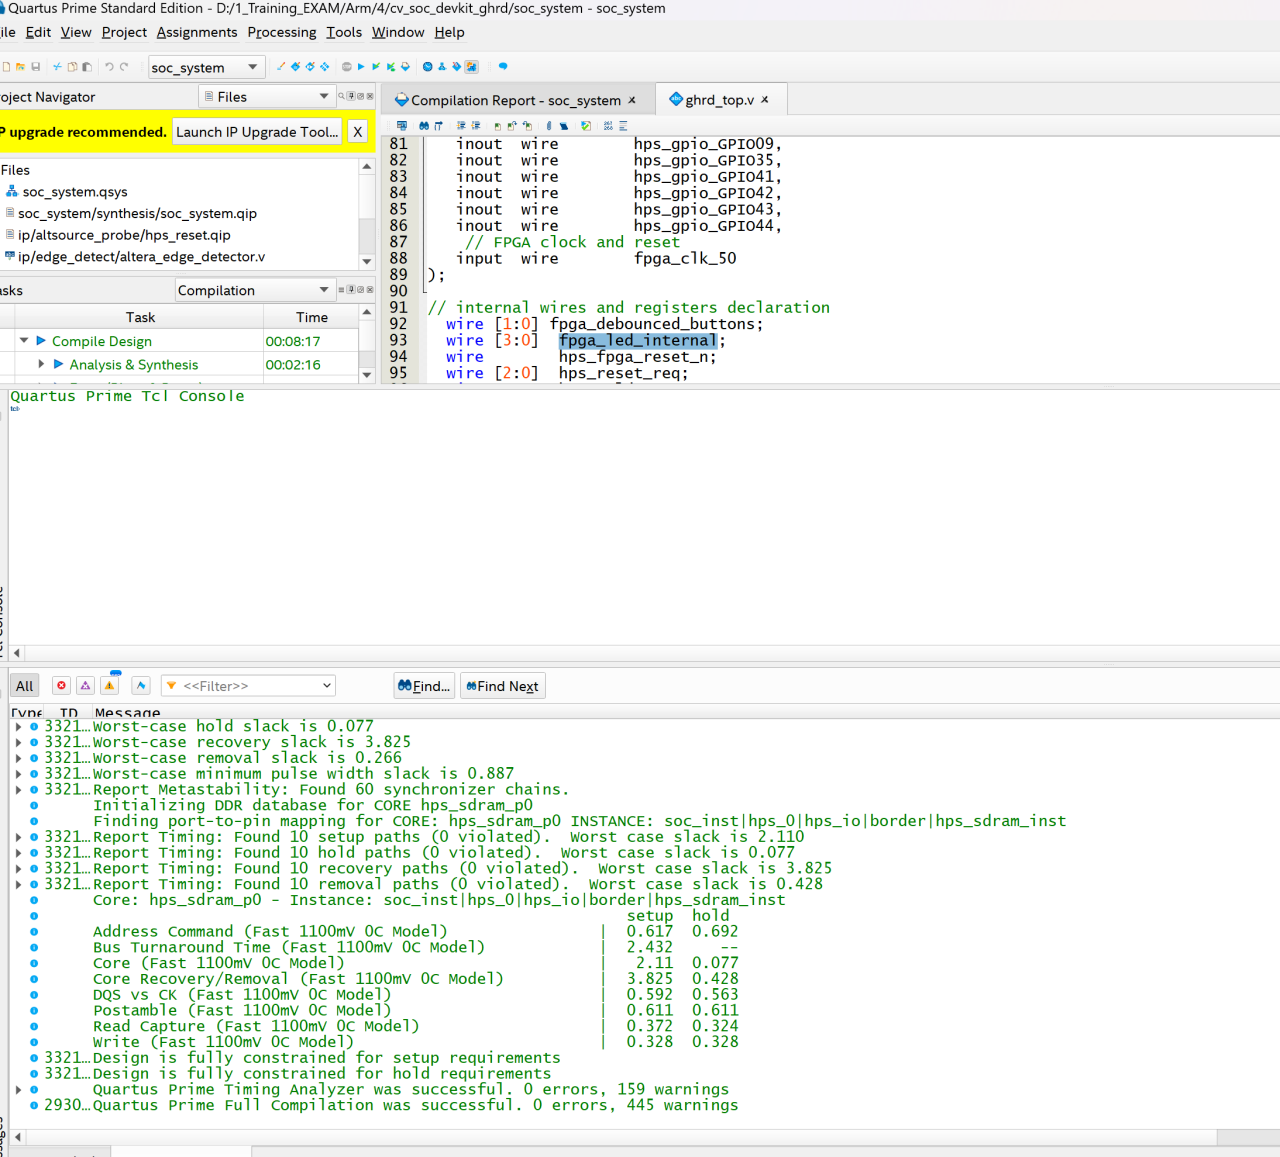
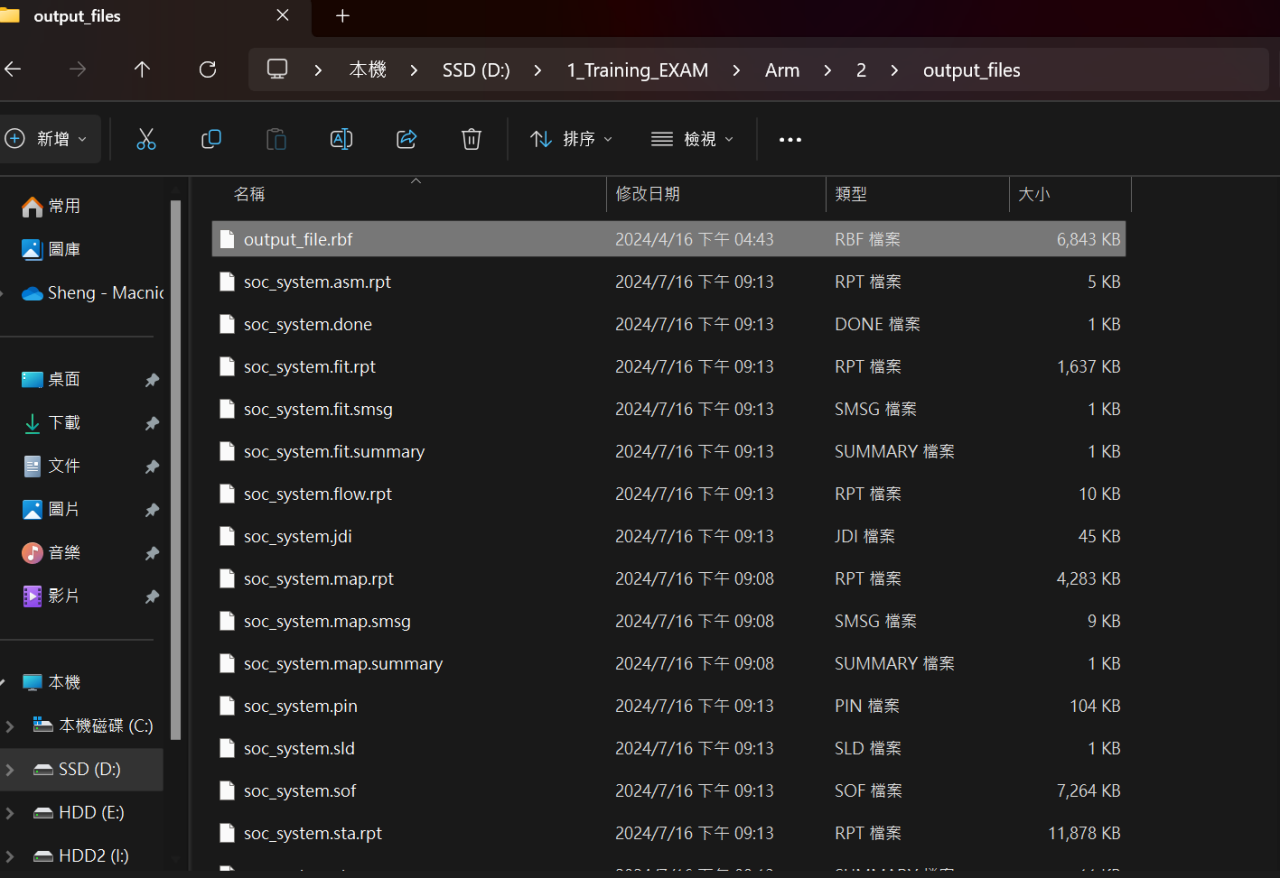
Compiler 結束請透過.sof產生.rbf file.
若Quartus有更動連接或是功能,須將rbf檔案重新產生並加入SD CRAD
以下為Rocket Board參考範例,詳細參考連結如下:
https://www.rocketboards.org/foswiki/Documentation/BuildingBootloaderCycloneVAndArria10
U-Boot documentation
u-boot-socfpga/doc/README.socfpga at socfpga_v2022.07 · altera-opensource/u-boot-socfpga · GitHub
以下為GSRD範例環境,請根據自己Project建立所需環境。
2.環境建立
2.1 製作u-boot
下載並設定 Cyclone V SoC 所需的工具鏈
wget https://developer.arm.com/-/media/Files/downloads/gnu/11.2-2022.02/binrel/gcc-arm-11.2-2022.02-x86_64-arm-none-linux-gnueabihf.tar.xz
tar xf gcc-arm-11.2-2022.02-x86_64-arm-none-linux-gnueabihf.tar.xz
rm gcc-arm-11.2-2022.02-x86_64-arm-none-linux-gnueabihf.tar.xz
export PATH=`pwd`/gcc-arm-11.2-2022.02-x86_64-arm-none-linux-gnueabihf/bin:$PATH
Setup & 抓取GSRD EXAMPLE
mkdir cv_example.sdmmc
cd cv_example.sdmmc
export TOP_FOLDER=`pwd`
cd $TOP_FOLDER
rm -rf ghrd-socfpga-QPDS22.1STD_REL_GSRD_PR QPDS22.1STD_REL_GSRD_PR.zip cv_soc_devkit_ghrd
wget https://github.com/altera-opensource/ghrd-socfpga/archive/refs/tags/QPDS22.1STD_REL_GSRD_PR.zip
unzip QPDS22.1STD_REL_GSRD_PR.zip
mv ghrd-socfpga-QPDS22.1STD_REL_GSRD_PR/cv_soc_devkit_ghrd .
rm -rf ghrd-socfpga-QPDS22.1STD_REL_GSRD_PR QPDS22.1STD_REL_GSRD_PR.zip
cd cv_soc_devkit_ghrd
rm -rf software
~/intelFPGA/22.1std/nios2eds/nios2_command_shell.sh \
make generate_from_tcl
~/intelFPGA/22.1std/nios2eds/nios2_command_shell.sh \
make sof
製作U-boot
cd $TOP_FOLDER/cv_soc_devkit
mkdir software/bootloader && cd software/bootloader
git clone https://github.com/altera-opensource/u-boot-socfpga
cd u-boot-socfpga
# comment out next line to use the latest U-Boot branch
# git checkout -b test-bootloader -t origin/socfpga_v2022.04
cd $TOP_FOLDER/cv_soc_devkit_ghrd/software/bootloader/u-boot-socfpga/arch/arm/mach-socfpga/cv_bsp_generator
python3 cv_bsp_generator.py -i $TOP_FOLDER/cv_soc_devkit_ghrd/hps_isw_handoff/soc_system_hps_0 \
-o ../../../../board/altera/cyclone5-socdk/qts
cd $TOP_FOLDER/cv_soc_devkit_ghrd/software/bootloader/u-boot-socfpga
export CROSS_COMPILE=arm-none-linux-gnueabihf-
make socfpga_cyclone5_defconfig
make -j 48
最後產生以下檔案
…/cv_soc_devkit_ghrd/software/bootloader/u-boot-socfpga
Spl/u-boot-spl :SPL ELF executable
u-boot :U-Boot ELF executable
u-boot-with-spl.sfp:Bootable file: four copies of SPL and one copy on U-Boot image
2.2 建置二進位文件
建立資料夾
rm -rf linux-bin && mkdir linux-bin
export set LINUX_BIN=`pwd`/linux-bin
mkdir -p $LINUX_BIN/a9
建立Linux Kernel
rm -rf linux && mkdir linux
export set LINUX_TOP=`pwd`/linux
cd $LINUX_TOP
export ARCH=arm
export CROSS_COMPILE=arm-none-linux-gnueabihf-
cd $LINUX_TOP
git clone https://github.com/altera-opensource/linux-socfpga linux-socfpga.a9
cd linux-socfpga.a9
git checkout -b scarthgap -t origin/socfpga-5.15.50-lts
make socfpga_defconfig
make -j 48 zImage Image dtbs modules
make -j 48 modules_install INSTALL_MOD_PATH=modules_install
rm -rf modules_install/lib/modules/*/build
rm -rf modules_install/lib/modules/*/source
建立連結
ln -s $LINUX_TOP/linux-socfpga.a9/arch/arm/boot/zImage $LINUX_BIN/a9/
ln -s $LINUX_TOP/linux-socfpga.a9/arch/arm/boot/Image $LINUX_BIN/a9/
ln -s $LINUX_TOP/linux-socfpga.a9/arch/arm/boot/dts/socfpga_cyclone5_socdk.dtb $LINUX_BIN/a9/
ln -s $LINUX_TOP/linux-socfpga.a9/arch/arm/boot/dts/socfpga_arria10_socdk_sdmmc.dtb $LINUX_BIN/a9/
ln -s $LINUX_TOP/linux-socfpga.a9/arch/arm/boot/dts/socfpga_arria10_socdk_qspi.dtb $LINUX_BIN/a9/
ln -s $LINUX_TOP/linux-socfpga.a9/arch/arm/boot/dts/socfpga_arria10_socdk_nand.dtb $LINUX_BIN/a9/
ln -s $LINUX_TOP/linux-socfpga.a9/modules_install/lib/modules $LINUX_BIN/a9/
產生以下檔案
…/$LINUX_BIN/a9
zImage :compressed kernel image
Image :uncompressed kernel image
socfpga_cyclone5_socdk.dtb:
cyclone v device tree blob for both sdmmc and qspi boot
modules:kernel loadable modules
建立Yocto Rootfs
sudo apt install gawk wget git diffstat unzip texinfo gcc build-essential chrpath \
socat cpio python3 python3-pip python3-pexpect xz-utils debianutils iputils-ping \
python3-git python3-jinja2 libegl1-mesa libsdl1.2-dev pylint3 xterm python3-subunit \
mesa-common-dev zstd liblz4-tool
cd $LINUX_TOP
mkdir rootfs && cd rootfs
export set ROOTFS_TOP=`pwd`
cd $ROOTFS_TOP
rm -rf cv && mkdir cv && cd cv
git clone -b kirkstone https://git.yoctoproject.org/poky
git clone -b kirkstone https://git.yoctoproject.org/meta-intel-fpga
source poky/oe-init-build-env ./build
echo 'MACHINE = "cyclone5"' >> conf/local.conf
echo 'BBLAYERS += " ${TOPDIR}/../meta-intel-fpga "' >> conf/bblayers.conf
# Uncomment next line to add more packages to the image
# echo 'CORE_IMAGE_EXTRA_INSTALL += "openssh gdbserver"' >> conf/local.conf
bitbake core-image-minimal
#$ROOTFS_TOP/cv/build/tmp/deploy/images/cyclone5/core-image-minimal-cyclone5.tar.gz
產生以下檔案
core-image-minimal-cyclone5.tar.gz:Cyclone V rootfs archive
2.3 建置SD Card Image
確保以下檔案已產生完畢
zImage
socfpga_cyclone5_socdk.dtb
core-image-minimal-cyclone5.tar.gz
u-boot-with-spl.sfp
路徑建立&SD Card script
cd $TOP_FOLDER/
sudo rm -rf sd_card && mkdir sd_card && cd sd_card
wget https://releases.rocketboards.org/2021.04/gsrd/tools/make_sdimage_p3.py
chmod +x make_sdimage_p3.py
FAT Partition
cd $TOP_FOLDER/sd_card
mkdir sdfs && cd sdfs
cp $LINUX_BIN/a9/zImage .
cp $LINUX_BIN/a9/socfpga_cyclone5_socdk.dtb .
mkdir extlinux
echo "LABEL Linux Default" > extlinux/extlinux.conf
echo " KERNEL ../zImage" >> extlinux/extlinux.conf
echo " FDT ../socfpga_cyclone5_socdk.dtb" >> extlinux/extlinux.conf
echo " APPEND root=/dev/mmcblk0p2 rw rootwait earlyprintk console=ttyS0,115200n8" >> extlinux/extlinux.conf
Rootfs Partition
cd $TOP_FOLDER/sd_card
sudo rm -rf rootfs
mkdir rootfs && cd rootfs
sudo tar xf $ROOTFS_TOP/cv/build/tmp/deploy/images/cyclone5/core-image-minimal-cyclone5.tar.gz
sudo rm -rf lib/modules/*
sudo cp -r $LINUX_BIN/a9/modules/* lib/modules
cd $TOP_FOLDER/sd_card
cp ../cv_soc_devkit_ghrd/software/bootloader/u-boot-socfpga/u-boot-with-spl.sfp .
建立SD Card image
cd $TOP_FOLDER/sd_card
sudo python3 ./make_sdimage_p3.py -f \
-P u-boot-with-spl.sfp,num=3,format=raw,size=10M,type=A2 \
-P sdfs/*,num=1,format=fat32,size=100M \
-P rootfs/*,num=2,format=ext3,size=300M \
-s 512M \
-n sdcard_cv.img
3.軟體執行
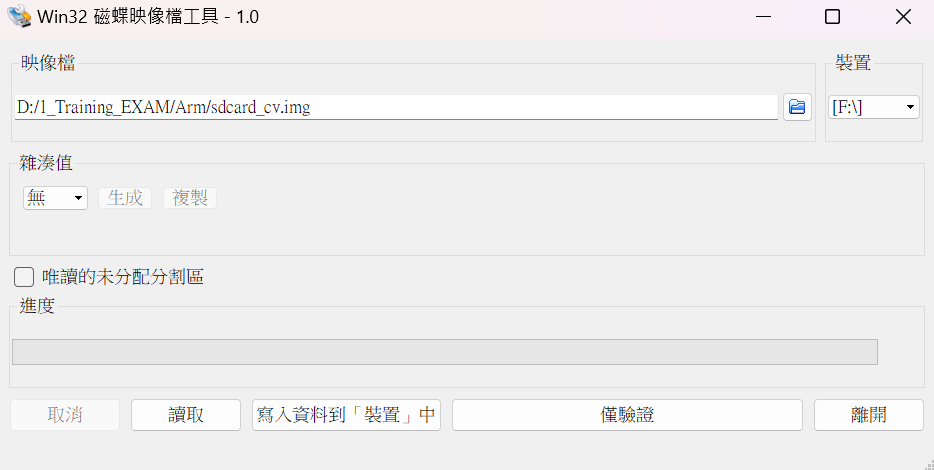 SD Card 燒錄,Win32DiskImage,F槽為SD CARD
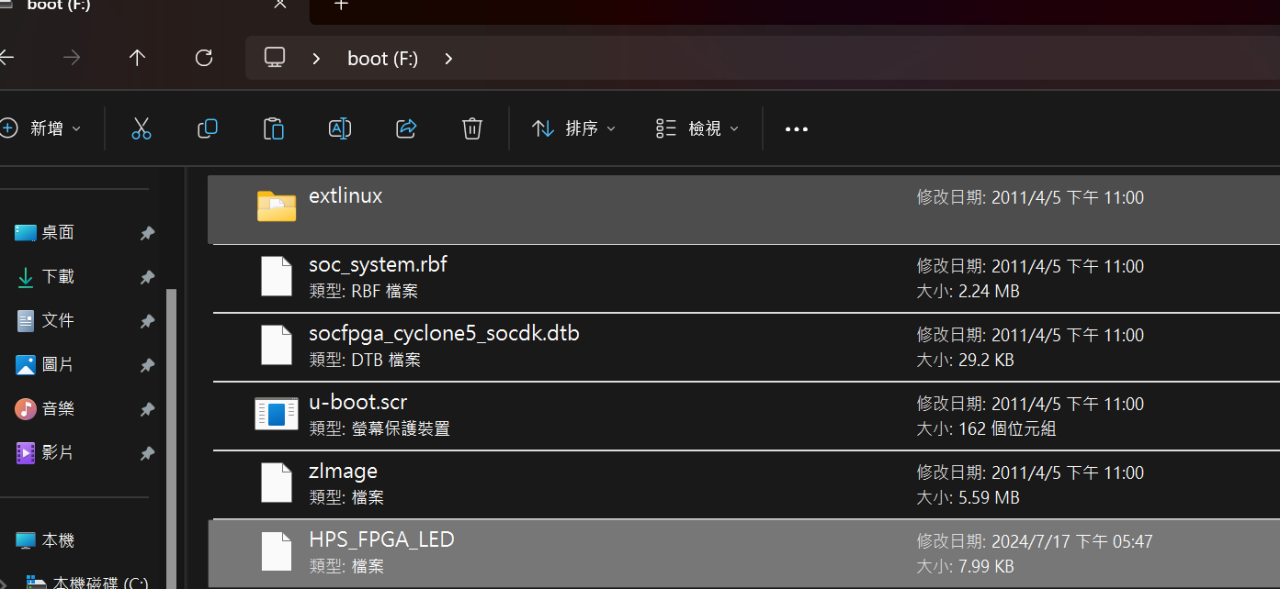 將C CODE執行檔複製到SD Card中
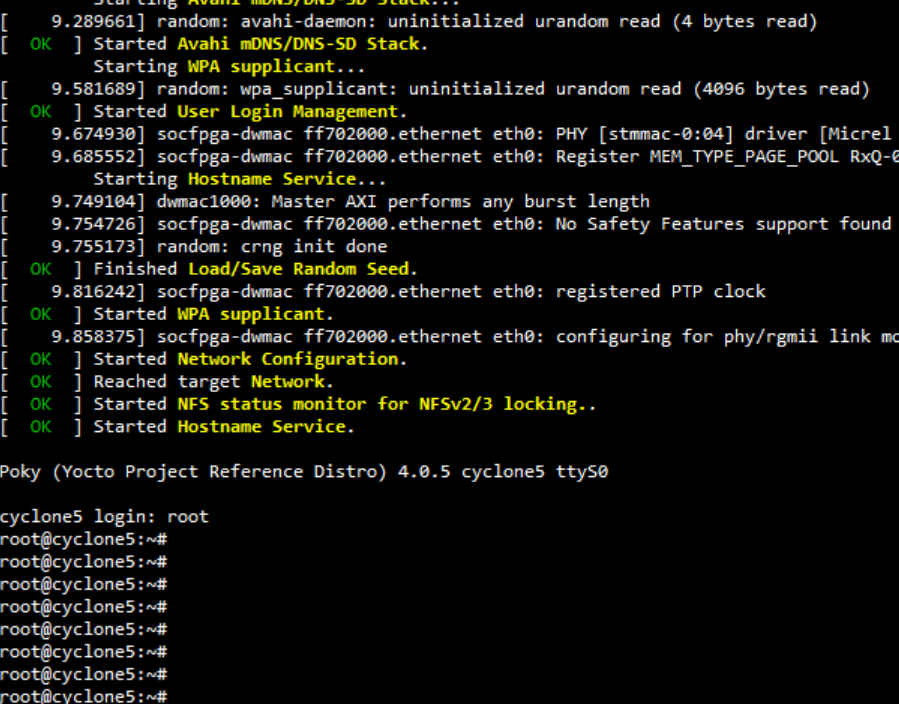 開發版上電即可執行。
執行開發版
結論
- 下載PuTTY
- 選定COM(115200)
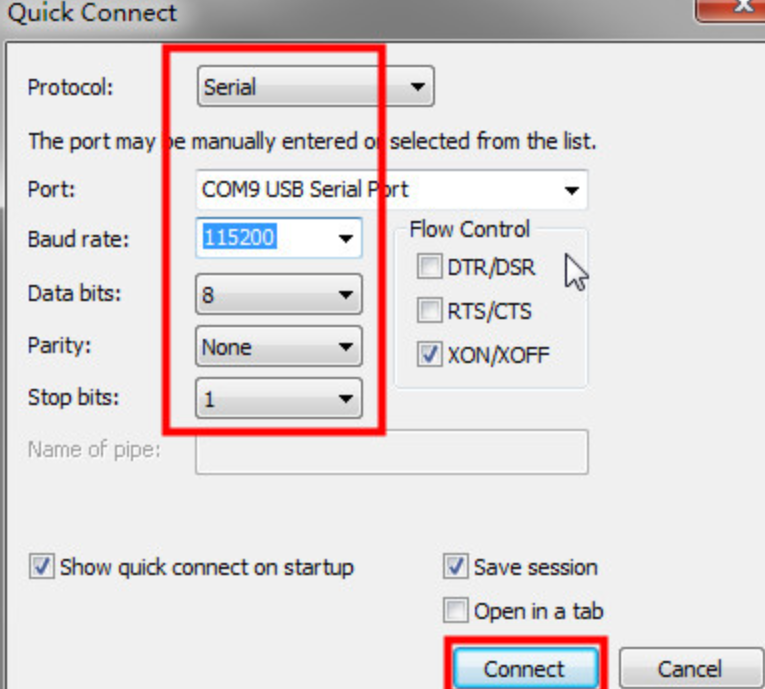
- 開發版上電,並連接電腦
- 帳號為root無密碼
- 開機成功後輸入以下操作
- fdisk -l #查看分區
- mount -t vfat /dev/mmcblk0p1 /mnt #將mmcblk0p1掛載到mnt
- cd /mnt
- ls
- 執行./HPS_FPGA_LED 觀看結果
總結
總之,Altera SoC FPGA是一種結合了FPGA可編程邏輯和硬核處理器的晶片,具有高度的靈活性和性能。如果您對此有更多問題歡迎洽詢茂綸。
You may also want to know
-
2026年5月14日
Altera SoC FPGA 開發指南
在現代嵌入式系統設計中,SoC (System on Chip) FPGA 憑藉其獨特的架構,成為了高效能與高彈性應用的首選。它將強大的硬體處理器系統(HPS,通常為 ARM Cortex 架構處理器)與靈活的 FPGA 邏輯陣列完美結合在一起。本文將以 Altera的開發環境(如 Agilex 5 或 Cyclone V 等元件)為背景,深入探討如何透過 Quartus Prime 軟體與 Platform Designer 進行開發,並詳細解析 HPS 與 FPGA 之間關鍵的資料交換與通訊機制。
altera
altera
2026
-
2026年2月24日
Altera FPGA Developer Site:資源導覽與應用實踐
Altera FPGA Developer Site是一個專為 Altera FPGA 系列產品所打造的戰略性生態系統,其核心目標在於降低開發風險並加速技術創新。此平台為從初學者到資深專家的所有使用者提供了一個統一的入口,無論開發者處於哪個階段,都能在此找到加速專案開發所需的關鍵資源。
altera
altera
2026
-
2025年10月22日
Altera Agilex FPGA:引領次世代乙太網路革命
在當今資料洪流與 AI 爆炸性成長的時代,網路基礎設施面臨前所未有的挑戰。市場對於超高速、高彈性、低延遲的乙太網路需求日益增長,傳統的 10G 或 25G Ethernet 已不再足夠,100G、200G、乃至 400G 與 800G Ethernet 正快速部署。在這場網路技術的全面升級戰中,Altera Agilex FPGA 不僅是關鍵推手,更憑藉其模組化架構與超高彈性,成為重塑乙太網路核心的要角。
altera
altera
2025